Launch Firefox with GeckoDriver (latest)
This article provides a detailed, step by step guide on how to launch Firefox with Selenium Geckodriver. In this article we use the latest versions of Selenium, Firefox & Geckodriver and show you how you can launch Firefox by providing updated code snippets. The tool versions that we will be using in this article are –
- Selenium – version 3.11.0
- Firefox – version 59.0.2 (Firefox Quantum)
- Geckodriver – version 0.20.1
Are you using an older version of Selenium Webdriver? Make sure you switch to the latest Selenium Webdriver version to avoid compatibility issues!!

What is Selenium Geckodriver?
Let us first start with the very basics – What is Gecko and GeckoDriver? Gecko is a web browser engine used in many applications developed by Mozilla Foundation and the Mozilla Corporation, most noticeably the Firefox web browser, its mobile version other than iOS devices, their email client Thunderbird and many other open source software projects. You can get more information about Gecko here – https://en.wikipedia.org/wiki/Gecko_(software)
Geckodriver is a proxy for using W3C WebDriver-compatible clients to interact with Gecko-based browsers i.e. Mozilla Firefox in this case. This program provides the HTTP API described by the WebDriver protocol to communicate with Gecko browsers. It translates calls into the Marionette automation protocol by acting as a proxy between the local and remote ends.
How things worked before Geckodriver and Selenium 3
If you are new to Selenium and you have started directly with Selenium 3.x, you would not know how Firefox was launched with the previous versions of Selenium (version 2.53 and before). It was a pretty straight forward process where you were not required to use Geckodriver or any other driver. After you download and install Selenium, you just write the code to instantiate the WebDriver and open Firefox. The code snippet is shown below –
public class FirefoxTest { public static void main(String[] args) { WebDriver driver = new FirefoxDriver(); driver.get(“http://www.google.com"); } }
| 1234567 | public class FirefoxTest { public static void main(String[] args) { WebDriver driver = new FirefoxDriver(); driver.get(“http://www.google.com“); }} |
|---|---|
If you just run this code, you would notice that Firefox browser would get opened and Google.com would be displayed in the browser. This is how it worked with Selenium 2.53 and before. Let’s see whats the new implementation in Selenium 3.
What happens when you don’t use Firefox Geckodriver with Selenium 3.x
To try this out, all that you need to do is point your JAR files to the latest version of Selenium 3 and then run the same code that is given above. You will now notice that Google.com page would not open in a new Firefox window. Instead you will see an error message as shown below –
java.lang.IllegalStateException: The path to the driver executable must be set by the webdriver.gecko.driver system property; for more information, see https://github.com/mozilla/geckodriver. The latest version can be downloaded from https://github.com/mozilla/geckodriver/releases
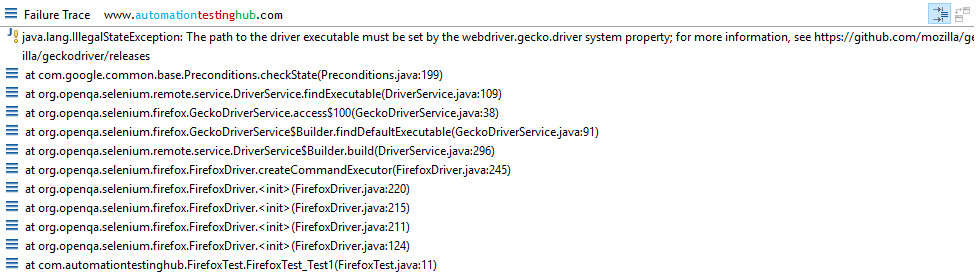
You will need to use Selenium Geckodriver to remove this error. Let us see how this can be done.
How to use Selenium Geckodriver to launch Firefox
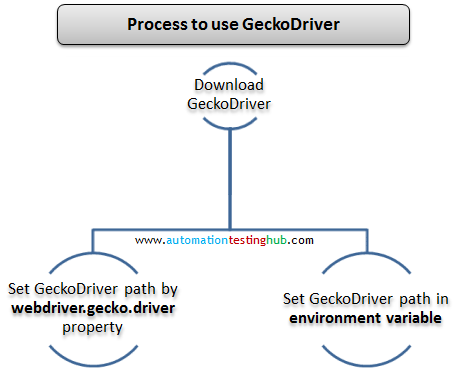
To launch Firefox with Selenium Geckodriver, you will first need to download Geckodriver and then set its path. This can be done in two ways as depicted in the below image –
Check if Firefox is 32-bit or 64-bit
There are two versions of Geckodriver for Windows: 32-bit and 64-bit. Based on whether your Firefox is 32-bit or 64-bit, you need to download the corresponding Geckodriver exe. In this section, you will first check whether your Firefox is 32-bit or 64-bit
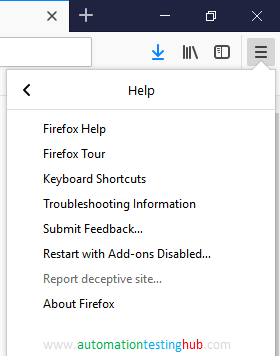
1. Open Firefox on your machine. Click on Hamburger icon from the right corner to open the menu as shown below
![]()
2. From this menu, click on Help icon (Help icon is marked in red box in the above image)
3. Once you click on Help icon, the Help Menu would be displayed
4. Click on About Firefox from the Help menu. About Mozilla Firefox popup would be displayed

5. Note down whether Firefox is 32 or 64 bit. For us, Firefox is 64-bit as shown in the above image. Now close this popup and close Firefox as well.
Download the latest version of Selenium Geckodriver
Follow the steps given below to download Geckodriver –
1. Open this Github page – https://github.com/mozilla/geckodriver/releases
2. Download the latest release (windows version) based on whether your Firefox is 32-bit or 64-bit. We are downloading geckodriver-v0.20.1-win64.zip, as we have 64-bit Firefox
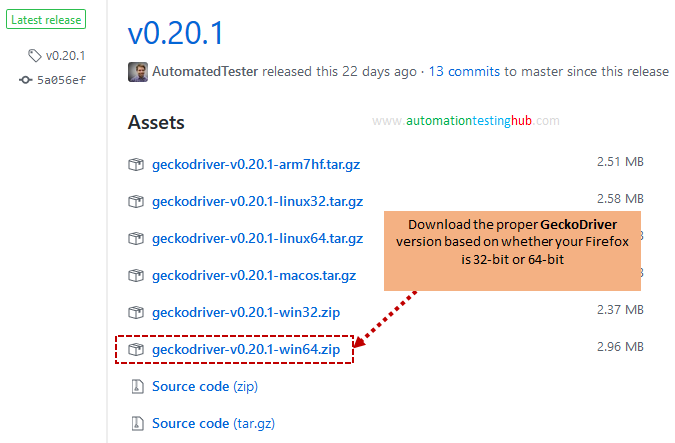
3. Once the zip file is downloaded, unzip it to retrieve the driver – geckodriver.exe
This completes the downloading process. Now let’s see how you can use it in your project. There are 2 methods using which you can configure this driver in your project. You can use any of these methods.
According to this statcounter report, Chrome is by far the most used browser. If you are learning Selenium, make sure that you run your scripts on Chrome browser as well
Launch Firefox Method 1 : webdriver.gecko.driver system property
With this method, you will have to add an additional line of code in your test case. Follow the steps given below to use this method –
1. Copy the entire path where you unzipped geckodriver.exe. Let us assume that the location is – D:\Firefox\geckodriver.exe. You will need to add System.setProperty with the driver location to your code.
The code to launch Firefox browser would look like this –
Important Note 1: In the folder paths in the below code, we have used double backslash (\). This is because Java treats single back slash () as an escape character. So you would need to use double back slash, everywhere you add some folder path.
public class FirefoxTest { public static void main(String[] args) { System.setProperty(“webdriver.gecko.driver”,”D:\Firefox\geckodriver.exe”); WebDriver driver = new FirefoxDriver(); driver.get(“http://www.google.com"); } }
| 123456789 | public class FirefoxTest { public static void main(String[] args) { System.setProperty(“webdriver.gecko.driver”,”D:\Firefox\geckodriver.exe”); WebDriver driver = new FirefoxDriver(); driver.get(“http://www.google.com“); }} |
|---|---|
Important Note 2: If you are using older versions of Geckodriver (v0.16.1 or before), then you will also need to provide the Firefox Binary, otherwise you might get the below error –
org.openqa.selenium.SessionNotCreatedException: Expected browser binary location, but unable to find binary in default location, no ‘moz:firefoxOptions.binary’ capability provided, and no binary flag set on the command line
But please note that this is needed only for Geckodriver v0.16.1 or before. So for older Gecko versions, please use the below code where Firefox binary location has been provided using FirefoxOptions class.
public class FirefoxTest { public static void main(String[] args) { System.setProperty(“webdriver.gecko.driver”,”D:\Firefox\geckodriver.exe”); FirefoxOptions options = new FirefoxOptions(); options.setBinary(“C:\Program Files (x86)\Mozilla Firefox\firefox.exe”); //This is the location where you have installed Firefox on your machine WebDriver driver = new FirefoxDriver(options); driver.get(“http://www.google.com"); } }
| 123456789101112 | public class FirefoxTest { public static void main(String[] args) { System.setProperty(“webdriver.gecko.driver”,”D:\Firefox\geckodriver.exe”); FirefoxOptions options = new FirefoxOptions(); options.setBinary(“C:\Program Files (x86)\Mozilla Firefox\firefox.exe”); //This is the location where you have installed Firefox on your machine WebDriver driver = new FirefoxDriver(options); driver.get(“http://www.google.com“); }} |
|---|---|
3. Run this code to verify that everything is working fine. You will notice that google.com gets opened in new Firefox window
Launch Firefox Method 2 : Set property in Environment Variables
1. Copy the entire folder location where geckodriver.exe is saved. If the entire path is D:\Firefox\geckodriver.exe, then the folder location would be D:\Firefox\
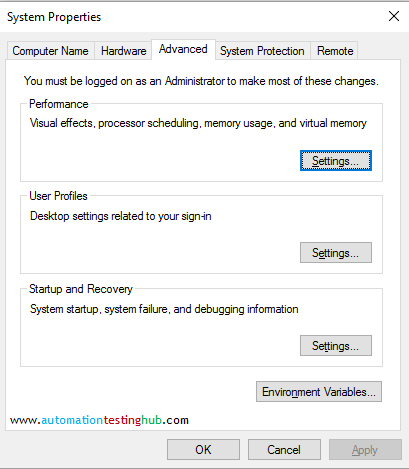
2. Open Advanced tab in System Properties window as shown in below image.
3. Open Environment Variables window.
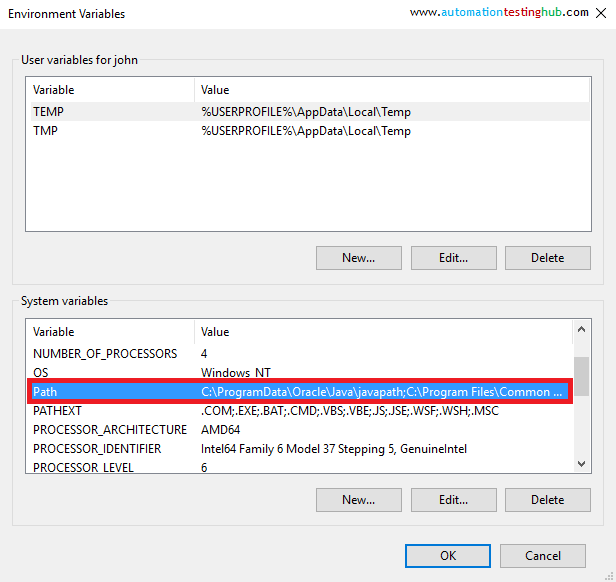
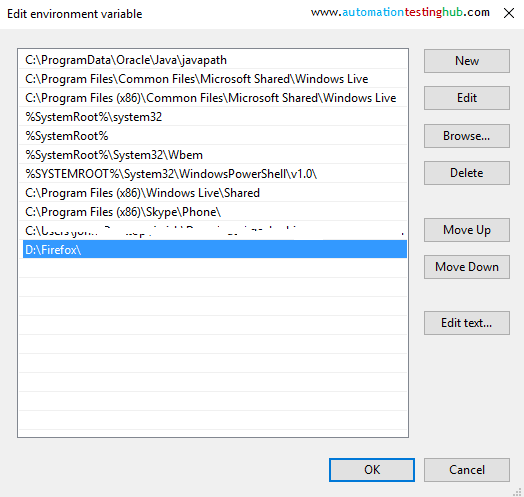
4. In System variables section, select the Path variable (highlighted in the above image) and click on Edit button. Then add the location of Geckodriver that we copied in step 1 (D:\Firefox), to path variable (below image shows UI for Windows 10)
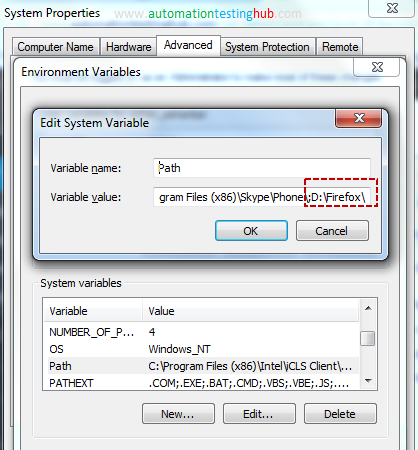
5. If you are using Windows 7, then move to the end of the Variable value field, then add a semi-colon (;) and then add the folder location as shown below (Semicolon acts as a separator between multiple values in the field)
6. Click on Ok button to close the windows. Once the path is set, you would not need to set the System property every time in the test script. Your test script would simply look like this –
For GeckoDriver v0.20, v0.19.0, v0.18.0 and v0.17.0 –
public class FirefoxTest { public static void main(String[] args) { WebDriver driver = new FirefoxDriver(); driver.get(“http://www.google.com"); } }
| 1234567 | public class FirefoxTest { public static void main(String[] args) { WebDriver driver = new FirefoxDriver(); driver.get(“http://www.google.com“); }} |
|---|---|
For GeckoDriver v0.16.1 or before –
public class FirefoxTest { public static void main(String[] args) { FirefoxOptions options = new FirefoxOptions(); options.setBinary(“C:\Program Files (x86)\Mozilla Firefox\firefox.exe”); //This is the location where you have installed Firefox on your machine WebDriver driver = new FirefoxDriver(options); driver.get(“http://www.google.com"); } }
| 12345678910 | public class FirefoxTest { public static void main(String[] args) { FirefoxOptions options = new FirefoxOptions(); options.setBinary(“C:\Program Files (x86)\Mozilla Firefox\firefox.exe”); //This is the location where you have installed Firefox on your machine WebDriver driver = new FirefoxDriver(options); driver.get(“http://www.google.com“); }} |
|---|---|
7. Run the code to check that it works fine.
This completes our article on how you can use launch Firefox with Selenium GeckoDriver. Try it out and let us know if this worked for you. Feel free to contact us using comments section if you face any issue while implementing this.
UPDATE 1 [30 April, 2017]: Use DesiredCapabilities and FirefoxOptions to launch Firefox with Selenium GeckoDriver
public class FirefoxTest { public static void main(String[] args) { FirefoxOptions options = new FirefoxOptions(); options.setBinary(“C:\Program Files (x86)\Mozilla Firefox\firefox.exe”); //Location where Firefox is installed DesiredCapabilities capabilities = DesiredCapabilities.firefox(); capabilities.setCapability(“moz:firefoxOptions”, options); //set more capabilities as per your requirements FirefoxDriver driver = new FirefoxDriver(capabilities); driver.get(“http://www.google.com"); } }
| 1234567891011121314 | public class FirefoxTest { public static void main(String[] args) { FirefoxOptions options = new FirefoxOptions(); options.setBinary(“C:\Program Files (x86)\Mozilla Firefox\firefox.exe”); //Location where Firefox is installed DesiredCapabilities capabilities = DesiredCapabilities.firefox(); capabilities.setCapability(“moz:firefoxOptions”, options); //set more capabilities as per your requirements FirefoxDriver driver = new FirefoxDriver(capabilities); driver.get(“http://www.google.com“); }} |
|---|---|
Here are a few hand-picked articles for you to read next: